The $500 Home Studio: A Budget Signal Chain That Actually Gets Records Made
A sub-$500 studio setup can absolutely produce clean vocals, usable mixes, and release-ready demos if the money goes into the right places. Here’s the most efficient budget chain for 2026, plus what to buy, what to skip, and where the real bottlenecks live.
A sub-$500 home studio will not give you a fake “pro studio in a box.” What it can give you is something more useful: a lean recording chain that lets you track vocals, sketch songs, program beats, edit takes, and make mixes that translate. For a lot of producers, that is the actual goal. Not prestige gear. Not a desk full of blinking boxes. A workflow that removes friction.
If you build it correctly, a budget setup becomes a production shortcut. It encourages you to make decisions faster, capture ideas before they disappear, and stop blaming your gear for issues that are really workflow problems. The key is to spend on the bottlenecks that matter most: a reliable audio interface, honest monitoring, a usable microphone, and a DAW that will not get in your way.
The core rule: buy for the chain, not the catalog

Most budget studio mistakes come from lopsided spending. People dump too much money into a microphone and then monitor through bargain-bin headphones. Or they buy an expensive controller but record through a noisy interface. Under $500, every dollar has to serve the signal path.
The order of importance for a home studio under $500 is usually:
- Audio interface
- Monitoring headphones or speakers
- Microphone
- Mic stand, cable, pop filter, and basic accessories
- DAW and plugins, if not already owned
That hierarchy changes slightly if you are only making beats and never recording vocals. In that case, the monitors/headphones and interface still matter, but the microphone can wait while you prioritize a good MIDI workflow and stable software.
Best budget home studio setup under $500 in 2026
Here is the cleanest all-purpose setup for most producers and singer-songwriters who need to record vocals, guitar, and demos without blowing past the budget.
1) Audio interface: Focusrite Scarlett Solo or Steinberg UR12-class alternatives
Estimated price: $120–$170
This is where you should not cheap out too hard. A modern entry-level interface gives you lower latency, cleaner preamps, direct monitoring, and better driver stability than the random no-name boxes that save you $40 and cost you hours later. The Scarlett Solo remains a practical default because it is predictable, widely supported, and easy to troubleshoot. Steinberg, PreSonus, and Audient also have competitive entry-level options depending on current pricing.
What matters most here is not the logo. It is whether the interface has stable drivers on your computer, enough gain for your microphone, and a direct monitoring path so you can hear yourself without ugly latency. If you plan to record dynamic mics or quiet vocalists, gain matters more than you think.
2) Headphones: Audio-Technica ATH-M40x or Sony MDR-7506
Estimated price: $80–$110
For under $500, closed-back studio headphones are the smartest monitoring move. The ATH-M40x gives you a balanced, reliable starting point. The MDR-7506 remains a classic for a reason: it is bright enough to expose problems, light enough to wear for long sessions, and common enough that you can cross-check mixes against countless reference points.
If you do not have treated room acoustics, headphones are often a better investment than cheap speakers. Bad room reflections will lie to you faster than decent headphones will.
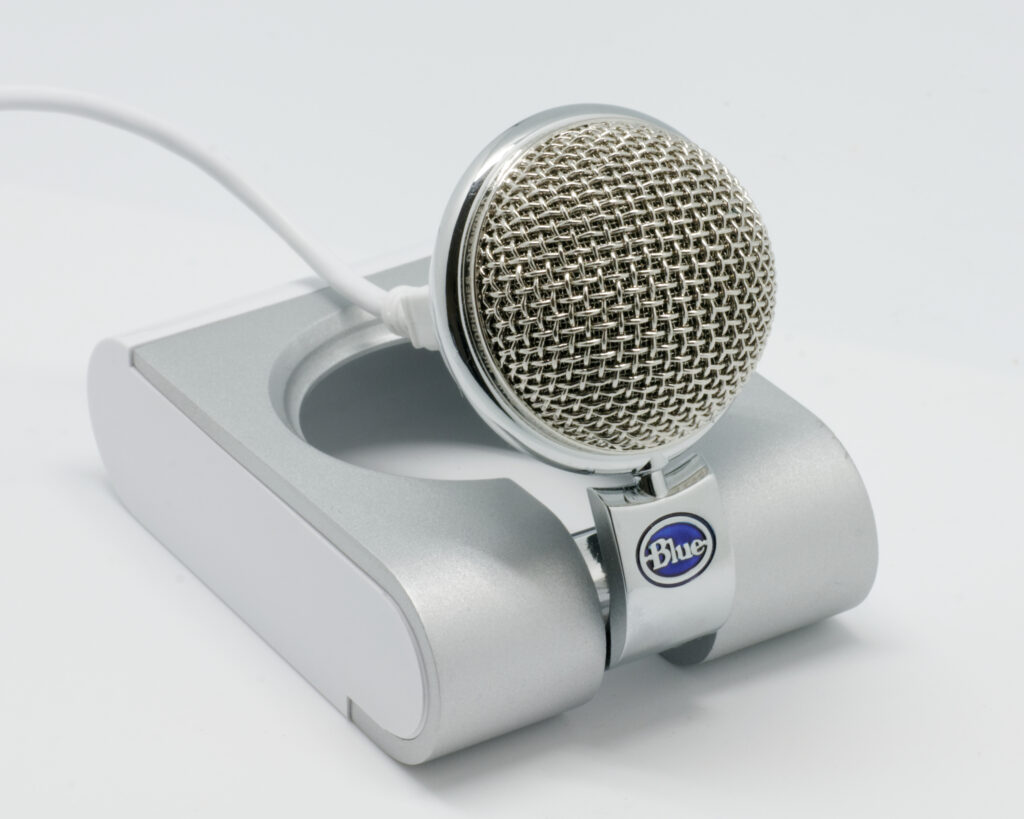
3) Microphone: Audio-Technica AT2020, Lewitt MTP 250 DM, or a used dynamic option
Estimated price: $80–$130
The AT2020 is still one of the safest budget condenser buys for home recording. It captures detail, works for vocals and acoustic instruments, and gives you a clear enough starting point for editing and mixing. But if your room is untreated, or your space is noisy, a dynamic microphone can be the smarter purchase.
That is why a used Shure SM58, SM57, or a comparable dynamic often punches above its price. Dynamics are less sensitive to room sound, less likely to exaggerate harsh reflections, and more forgiving in imperfect spaces. If you are recording in a bedroom, dynamic can beat “better” condenser every time.
4) Accessories: stand, pop filter, XLR cable, shock mount if needed
Estimated price: $40–$70
These are the boring purchases that make the setup actually work. A cheap but stable mic stand, a proper XLR cable, and a pop filter prevent a lot of beginner frustration. If your mic comes with a shock mount, great. If not, do not spend your last dollars on one unless you are dealing with significant floor vibration or desk noise.
One underrated budget move: use a sturdy stand instead of a desk mount whenever possible. Desk vibration gets into recordings more often than people expect.
5) DAW: Reaper, Ableton Live Lite, or your bundled software
Estimated price: $0–$60
If you are trying to stay under $500, Reaper is the obvious value play. It is cheap, extremely efficient, and does not handicap you with a weird learning curve once you understand its logic. If your interface comes with Ableton Live Lite, Cubase LE, or similar software, use what you have before buying another DAW.
The best DAW is the one you actually open every day. Under-budget setups succeed because they reduce decision fatigue, not because they promise infinite features.
Sample budget breakdowns that stay under $500
Different creators need different priorities. Here are a few realistic spending templates.
Vocalist / songwriter build
- Audio interface: $140
- Condenser or dynamic mic: $100
- Headphones: $90
- Accessories: $50
- DAW: $60
Total: about $440
This is the most balanced all-around setup for capturing vocals and writing full demos.
Beatmaker / producer build
- Audio interface: $140
- Headphones: $100
- MIDI controller: $90
- Accessories / cabling: $30
- DAW: $60
Total: about $420
If you are mostly programming drums, bass, and synth parts, skip the microphone for now and put your money into control surfaces and monitoring.
Quiet-room recording build
- Audio interface: $150
- Dynamic microphone: $100
- Headphones: $90
- Accessories: $50
- DAW: $0–$60
Total: about $390–$450
This is the best option for apartments or untreated bedrooms, where room noise is the enemy.
What to skip at this price point
There are a few purchases that look appealing but rarely improve results under $500.
Cheap monitor speakers in an untreated room: If the room is bad, speakers may make your mix decisions worse. Headphones are the better first move.
USB microphones with no upgrade path: Some are fine for streaming, but an interface plus separate mic is a better long-term studio foundation.
Large bundles with too many gimmicks: A giant starter pack often includes one weak piece after another. You want fewer, better components.
Fancy acoustic treatment kits before basics: A couple of broadband panels or even smart DIY absorption can help, but do not spend half your budget on foam that only looks like treatment.
The hidden upgrade that matters most: room strategy
Even the best budget studio gear cannot fully overcome a bad room. But you do not need to build a recording booth to improve things. Start simple: face away from reflective walls, record in the quietest part of the room, hang thick material behind the mic, and keep your monitoring level consistent. If you can afford even one or two real absorption panels, place them at first reflection points before chasing more gear.
For vocals, a good dynamic mic in a controlled corner can sound more usable than a pricier condenser in a bright room. That is one of the least glamorous truths in home recording.
Is a $500 home studio actually worth it?
Yes, if your goal is to make music consistently. The value of a budget studio is not raw fidelity alone. It is speed, repeatability, and the ability to turn ideas into finished tracks without waiting for external access.
For demo production, content creation, beat writing, vocal tracking, and pre-production, a well-chosen $500 setup is more than enough. You will still need good performances, gain staging discipline, and basic mix knowledge. But the gear itself will stop being the excuse.
If you are serious about producing, the real test is simple: can you open the session, hear yourself clearly, record cleanly, and make the next decision without fighting the machine? A budget studio that answers yes is not a compromise. It is a working tool.
Final buying advice
For most creators in 2026, the smartest under-$500 studio is: a trusted entry-level interface, honest headphones, one solid microphone, and the minimum accessories needed to record without friction. Do not optimize for the box art. Optimize for how quickly you can capture ideas and finish records.
If you want the shortest path to usable results, buy the interface first, monitor with decent headphones, and choose the microphone based on your room—not the marketing claims. That is the budget formula that actually holds up.
Image: Will this lo-fi studio work?.jpg | Flickr: Will this lo-fi studio work? | License: CC BY-SA 2.0 | Source: Wikimedia | https://commons.wikimedia.org/wiki/File:Will_this_lo-fi_studio_work%3F.jpg